Tuesday 31 July 2012

"Welcome Sign"
By Linda Thompson

"Welcome Sign"
Using a chipboard album cover I created this Welcome sign to hang near my front door its approx 22cm wide and 16cm tall.

I painted the chipboard a pale green then applied a fiber paste which is the same as texture paste but has small pieces of fibers in it to give more texture I then repainted it in the green and inked the edges in a dark brown ink.
I also painted the lace with the same colour green & used Impasto gel to attach the lace, There are a few 7cm lime green mulberry flowers folded in half and added to the background (they are a little hidden in the end but add colour around the flower clusters) I added some ribbon to the top and bottom and then painted the whole thing in Impasto gel including over the lace, flowers & ribbon, however I did leave a couple of the mulberry flower petals sticking up along with some of the bows on the ribbon.

Taking some chipboard alphas I painted them the same green and added white crackle paint over the top, once it had dried I just chipped a bit of the crackle paint away here and there to make some of the green shin through. I then attached them with glue and painted Impasto gel over the top.

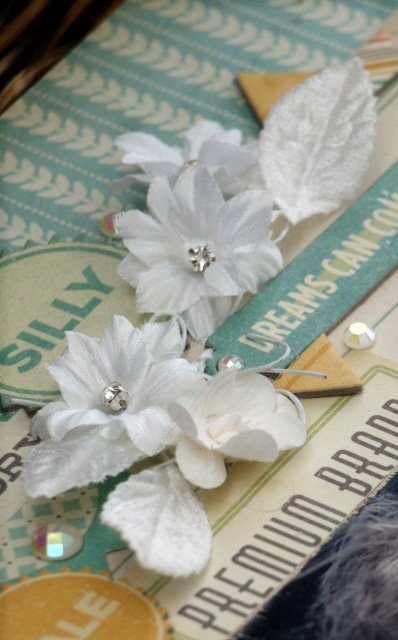
I have used a combination of Green Tara flowers including one of the new release flowers Sakura in green, these are fabric and so very cute and elegant.

Using my 3 favorite flowers Apple blossoms, gardenias & cherry blossoms to created the perfect colours I have glimmer misted some and adding small amounts of ink to others, by just lightly touching the tops of the flowers onto a ink pad. There are also a few roses thrown in here and there.

I have added some new fabric leaves in green and white here and there.
And created this wonderful spider flower from green tara string. To finish it off I used a glitter clear spray and sprayed the whole thing to give it a little sparkle.

Green Tara Products Used
Sakura Flower Lime - CODE: XF9221Li
Apple blossoms White - CODE: FDV044Tu/W, Ivory - CODE: FDV044Iv
Gardenias White - CODE: FDV054Wh, Peach - CODE: FDV054Pe
Cherry blossoms Cream - CODE: FLC22C, Peach/Cream CODE: FLC22PeC
Lace
Ribbon Butterfly on wire Lime - CODE: RB6764LG
Roses 1cm white - CODE: FDR001Wh, 1.5cm white CODE: FDR003Wh, 2cm white CODE: FDR009Wh
Fabric Leaves white - CODE: XL266Wh, Green - CODE: XL266GrP
Mulberry petals 7cm Lime - CODE: FDS021LG
String Green - CODE: PSGr
Misc- Chipboard pieces, tiles, metal, pearls, paint, ink, impasto, crackle paint, fiber paste, glimmer mist, glitter.

Regards
Linda

Monday 30 July 2012

"Little One"
By Linda Thompson

"Little One"
My 6th child was born 10 weeks early and now almost 8 I still have yet to scrap 90% off her first photos, so I started with an easy one at about 5 weeks of age with only a feeding tube left.


 I just love Webster Pages products but am often lost as to what to do, so this time I took the plunge and took a pair off scissors and cut the paper up to create smaller elements on the page and finished it off with the fantastic Green Tara products.
The main focus besides the photo has got to be the new Green tara Camellia flowers, here I have used peach, these are a great large bold flower to make a statement with, however they are not bulky like some and their design helps them to stay uncrushed in your albums. 

Apple blossoms are one of my favorite flowers they can be delicate but yet bold here I have glimmer misted a white flower to create an apricot/orange one to match the layout and removed the leaves.

Gardenias are just like apple blossoms only slightly larger and with an extra layer, here I have used a bold colour but toned it down with a touch of white ink so it blended more into the page and didn't become the main focus.

Cherry Blossoms are fantastic, and I must say I use these the most, once again I have used a bold red colour but toned them down with a touch of white ink, & added silver glitter paint to all of the flowers

A few mini roses placed here and there, again the darker colours slightly inked.
Silver sprays are great to add a little dimension and can easily be cut down to use just small parts as I have done here.

And who could forget the lace, I have never been a big lace fan but since joining the Green Tara team I just love it and who wouldn't love the designs on offer. Here I have just used an ink pad in green to lightly colour the lace leaving a 3 tone affect with white & 2 tones of green.

A little touch of pearls and a bold red ribbon to finish the page off, & a little glitter on the tips of the flowers.

Green Tara Products Used
Camellia Flower Peach - CODE: XF9219Pe
Apple Blossoms White - CODE: FDV044Tu/W
Roses 1cm red - CODE: FDR001R, 2cm ivory - CODE: FDR009Iv
Gardenias Cherry - CODE: FDV054Ch
Cherry blossoms Red - CODE: FLC22R, Cream - CODE: FLC22C, Red/White - CODE: FLC22RW
Lace
Ribbon Lattice in Red - CODE: XF9221Li
Silver Spray Smoke - CODE: XB30526S
Twisted Pearl Ribbon Pink
Misc - Webster papers & stickers, paper doily, mulberry paper butterflies, white & brown ink.

Linda

Friday 27 July 2012

Welcome Back
To Our July Guest Designer
Heather Jacob


Hello everyone. Thanks for calling by. Today we have our 
"Guest Designer" for July, Heather Jacob,
 back with us. We all adore Heather's work & it is always a special treat to have her here.
All of us here at Green Tara would like to thank Heather for her amazing work she has shared with us here this month. We will definitely have to do it again Heather.
Thanks again.
The Green Tara Team   xoxo
.......................................................................................

Hello everyone, Heather here again to show you what I have been doing with some Green Tara goodies.
One of my very fave colour combos is RED/WHITE/BLACK
I love to layer the papers behind the photo to draw the eye towards the focal point and create mystery, sometimes only small sections of paper are seen, ( less is more ),  but without that tiny piece the entire page can loose that important colour or design … just by adding tiny pieces of colour eg stamps /paper /fabric/ can be just what the page is needing.
Try experimenting with this idea and you will be surprised to  see how different the layout looks by adding or removing tiny pieces.  Always move elements around the page until you are happy.  Sometimes by adding a coloured brad, fills a tiny corner or edge to complete the page perfectly.

 
I have created two clusters of flowers here on opposing corners … combining the red/black/white together.

 
The flowers are poked under the layers adding dimension and interest .


I have altered the large black Heirloom silk & organza flower  by separating the petals and just leaving myself with a smaller flower and the remaining sections of the flower will be used on another project, at a later time. Thanks for popping by. Hope to see you again soon.
Hugs Heather

Heather's Blog    http://heatherartandlife.blogspot.com.au/

Green Tara Items used
3cm Cherry blossoms red
CODE FLC22R
3cm Cherry blossoms Red /white
CODE FLC22RW
3cm Cherry blossoms white
CODE FLC22Wh
4cm Black apple blossoms
CODE FDV044BL
4cm Red Apple blossoms
CODE FDV044R

Other items
Bazzill cardstock, Basic Grey & Authentique patterned papers, Imaginarium designs chipboard title.


"Good Times" by Tina Dalton


Hi everyone, just a quick post today. I did this layout the other day of my Grandaughter. Thought you might like to take a peek. As usual, it has got lots of Green Tara goodness on it. I hope you like it.


See you next time.
Tina xx

Green Tara Product Used

Velvet rose 8cm - Dusky Pink - code : XF9217DP

Velvet Leaves 3cm -Green - code: XL266GrPP

Silver/Acrylic/Spray - Flowers and Leaves

Apple Blossoms 4cm -Pink

Aster Batik Vintage - code : FD026BatV

Tuesday 24 July 2012

Showcasing Green Tara's
"Damask" Flowers
By Geraldine Passinati


Hi there, today I'm going to share with you a couple of layouts I've created featuring 
the 'Damask' flower. I have to admit this is one of my all time favourite flowers, it's
soft and feminine and has an amazing shape. Totally makes any creation stand out!


For my first  layout 'SIlly Memories' I have featured the 'Aqua Damask' flower and added the pretty white 'Swarovski Crystal centred' flowers, White 'Cherry Blossom' flowers  and white velvet leaves to highlight and softened the graphic style of my layout.


Green Tara Product Used


With my second  layout  'Beside the Seaside' I wanted to feature and show the
Beauty of the 'Ivory Damask' flower and how perfect it is for a summer layout.
 

Green Tara Product Used
 
Thanks for coming by the blog, enjoy!
Geraldine


Saturday 21 July 2012

"Enjoy this Moment" by Di Garling


Hello everyone, thanks for dropping in. Today I want to show you a layout I did recently for a challenge where  I have used lots of our favourite Green Tara flowers, leaves & trim.


I have used some of the NEW lime green  "Sakura" & "Tutu"  fabric flowers & I have teamed them with my all time favourite  aqua  "Gardenia" flowers. I just love these, I put them with everything. They are a great all rounder, they come in loads of colours too. I have also used lots of Green Tara Roses in various colours & sizes & then lastly I finished off by adding some of their little Velvet leaves.


I have also sprinkled some little mini Daisy type flowers around in both gold & brown.


You can see in this photo the gorgeous "Bud N Bow" trim, again in lime. This also comes in several colours too. Definately one of my favourites.
I have also used a 2 Crafty chipboard Flourish & Word to complete my layout..
Thanks for looking, & I hope I have inspired you to perhaps use some of our gorgeous flowers on your next project. 
 Until next time.
Cheers Di  xo

Green Tara Products Used
 3 Layer Gardenia Turquoise
CODE: FDV054Tu
 1cm Mini Rosebuds Yellow
CODE: FDV025Y
3cm Turquoise Roses
CODE: FDR024Tu
3cm White Roses
CODE: FDR024Wh
 3cm Yellow Roses
CODE: FDR024Y
 2cm Rose White
CODE: FDR009Wh
 1.5cm Roses Lime Green
CODE: FDR003LG
1.5cm Roses Turquoise
CODE: FDR003Tu
1.5cm Roses White
CODE: FDR003Wh
1.5cm Flower Gold
CODE: FDVGo
 1.5cm Flower Dark Brown
CODE: FDVBr2
Bud n Bow 16mm, Olive
CODE: RB6761Ol

Wednesday 18 July 2012

"Remember the Moment"
by Jan Rankine


Hi everyone I've just finished this layout using some more of Green Tara's fabulous products.


This satin edge organza ribbon is so easy to work with and makes such a beautiful bow.


I love the rich colours of these gorgeous flowers.  The roses are red and I added a little bit of copper paint to tone them down a bit to match the larger flowers.


This pic shows up the copper paint highlights pretty well I think.


Lastly I added some Gold Beaded Garland Trim, some Olive Loop Trim & finished off with some Green Velvet Leaves just to add the finishing touch to the page.

Green Tara Products Used:
 7mm Loop Trim  Olive
CODE: RBDAOl
 8mm Bead Garland, Gold
CODE: RBY16G
 3cm Red Roses
CODE: FDR024R

Thanks for stopping by the blog today.
Jan  xo

Tuesday 17 July 2012

Flowers Tutorial by Vickie Alberto

Almost all plain economical scrapbooking flowers are made from mulberry paper. Green Tara's newest white petals are especially thick which makes it easy to create these flowers:


They look like pretty fancy flowers but all I used was 4 layers of Green Tara white petals (2 of each style shown below) and a decorative centre. You can use other styles than I chose but you'll want the flower to be a big size (at least 2 inches/5 cm) with wide petals. This won't work very well with daisy style flowers.

You will need:
- 4 mulberry flowers layers
- a Q-tip
- warm water
- firm toothbrush
- decorative centre

Bottom layers (2 of these) Green Tara Code PFLP01:


Top layers (2 of these) Green Tara Code PFLP143:


Decorative center (your can use anything to match your project style!) Green Tara Code XF5034lv:


Instructions:

Step 1: Working with one flower at a time, take a wet Q-tip and "paint" the only the very edge of each petal with warm water. Do this to the 2 bottom layers and 1 of the top layers.

Step 2: With dry fingers, pull off the wet edge of the petals in 3-4 small tugs of each petal. Let dry without damaging the fuzzy edge you just created. HINT: I left one of the top layers plain (didn't fuzz the edge) to have contrast since my flower is all white.

Step 3: Once the 3 fuzzy layers are dry. Brush them with the firm toothbrush bristles to fuzz them even more. Stroke the bristles from the middle of the flower outwards.

Step 4: Glue your layers together and add the decorative center.


That's it! So simple yet so elegant and expensive looking. Another alternative is using your flower punches/dies to make your own petal layers too. Green Tara sells all kinds of beautiful mulberry paper in any color imaginable.
Thanks for visiting the blog today!
Vicky

Sunday 15 July 2012

A Layout & Card
By Guest Designer Heather Jacob


Hello everyone. Heather here again.  I wanted to show you a layout I did recently using some more beautiful Green Tara Fabric Flowers. My background here is actually a paper that looks like lace.
It is from 7Dots studio created by Finnabair from Poland  the lace looks so real doesn't it?


With this paper I wanted my layout to be simple so I have just used
strips of paper and lace and the clusters of Green Tara Flowers. 
Green Tara Products Used
 Green Tara Roses
Green Tara  "Poppy" Flower.
 
 A Card using Green Tara Flowers & Leaves


 Here is a little Card I made with a matching pocket. I have embellished it with some lovely
 Green Tara goodies of course.


I do love these rich coloured Green Tara Leaves at the top of my cluster. Icing on the cake really!!
I like the fact that they have a wire through them so that you can twist &  poke them to whatever shape you want & they stay in place.


These Green Tara Roses come in lots of different sizes & colours too.


Thanks for calling by & I do hope I have inspired you to use some flowers on your next project too.
I will be back later in the month to show you another project I have created using the lovely
 Green Tara goodies.
Heather  xo